From Visegrad With Love
The DMR and the Damage Done
The range from which we can engage the Covenant has been very consistent throughout the series. Most weapons can be bucketed in a few categories, from close range (shotguns, Assault Rifles), medium to long (the Halo 1 pistol, the Battle Rifle, Carbine) and very long (sniper weapons). Notably, the medium range category kept the scope limited to a 2x magnification. The famed Halo pistol packed a powerful punch, but it was limited by the 2x scope and lost a bit of accuracy over extreme range. In Halo 2 and 3, the BR had a burst-fire capability that spread bullets out slightly (though the spread was later patched out of the multiplayer component of Halo 2). Bungie explained this design philosophy in a Bungie Weekly Update back in June 2008. While the meat of the article was about the Multiplayer context, the design goals apply to Campaign equally (my emphasis added):
The Battle Rifle works this way because after Halo 2 it was returned to be a reliable headshot and anti-sniper weapon (in terms of pinging Snipers at distance from their scoped-in state). The first bullet in the burst fills this role – it is quite accurate (identical to the Halo 2 BR, but with a travel time), and will kill an unshielded unit with a headshot or ping a sniper.
Another design goal with the Battle Rifle in Halo 3 was to bring the kill-range closer. One way this was achieved was by giving bullets 2 and 3 from the BR a wider error, which makes them less likely to land outside of the BR’s intended effective range. Summarily, this reduces the BR’s effectiveness AND damage output at those ranges, without compromising its ability to finish a target at the same range.
The spread burst fire had the intentional effect of limiting the encounter distance and forcing us to come within a relatively short distance from the enemy to engage, enabling the other two legs of the golden tripod, melee and grenades, to enter the fray. It also allows the enemy to engage us with a richer array of weaponry. In short, it forced more combat elements into the encounters, causing them to play out differently more often, which in turn encouraged experimentation and improvisation. The mission designers took advantage of the limited range in the encounter designs, and the dynamic, changing battles that result are the fundamental combat experience that distinguishes and defines Halo. It’s worth noting that Paul Beretone (design lead for ODST) found even the BR’s impact on combat objectionable and tossed it entirely in ODST, and the replacement weapons brought the average engagement distance even closer.
The design of the DMR (and Nerfle) runs entirely counter to that approach. The DMR’s 3x zoom and added precision make it slot in closer to the sniper rifle than the BR in maximum effective range. While the BR could be fired 48 times at maximum capacity, a full DMR can carry 75 rounds. Added up, and the DMR has at least double the effective range of the BR and a 50% larger firing capacity on top of it.
We now have a standard weapon that allows us to engage the enemy from what used to be sniping distance but without the ammo limitations that come with sniper weapons. It turns out to be very difficult to craft encounters that play out in a variety of ways when we are equipped with this kind of firepower and are given an approach that leverages it, and the effect on combat is profound.
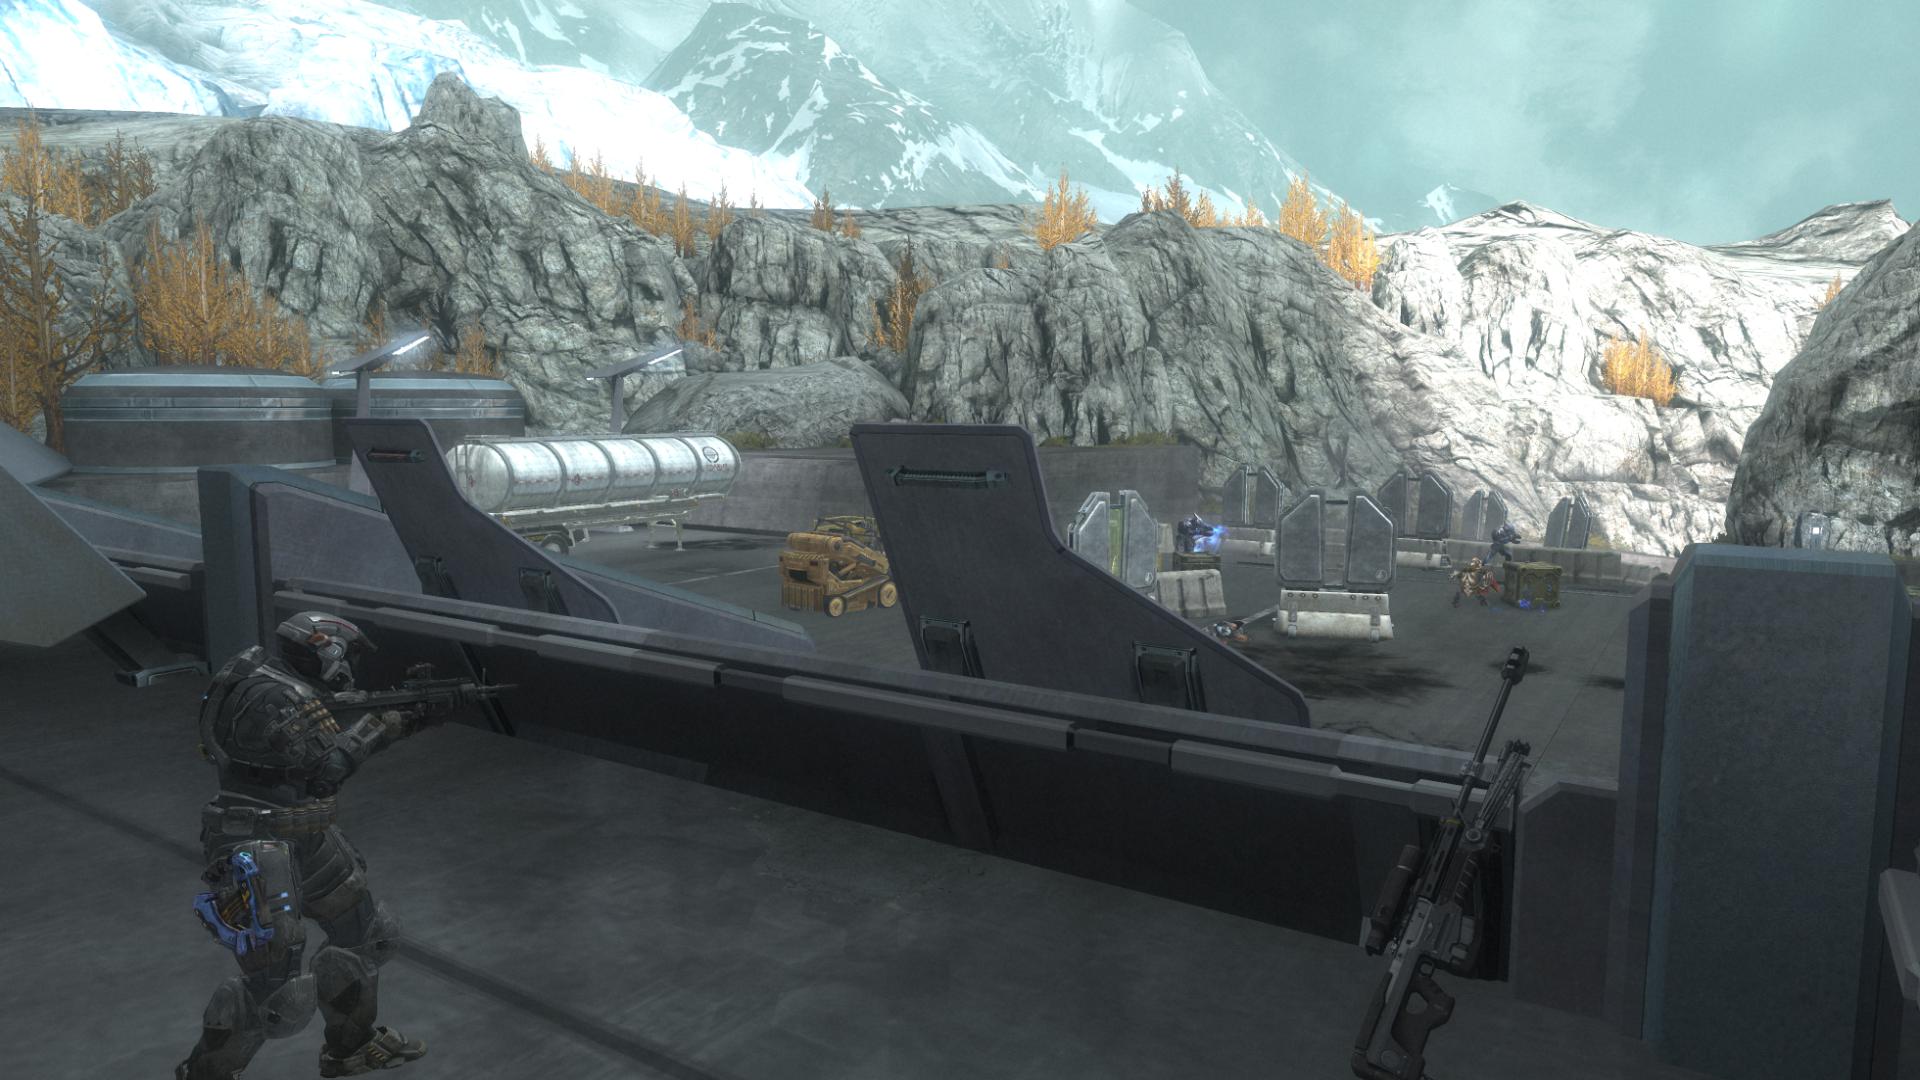
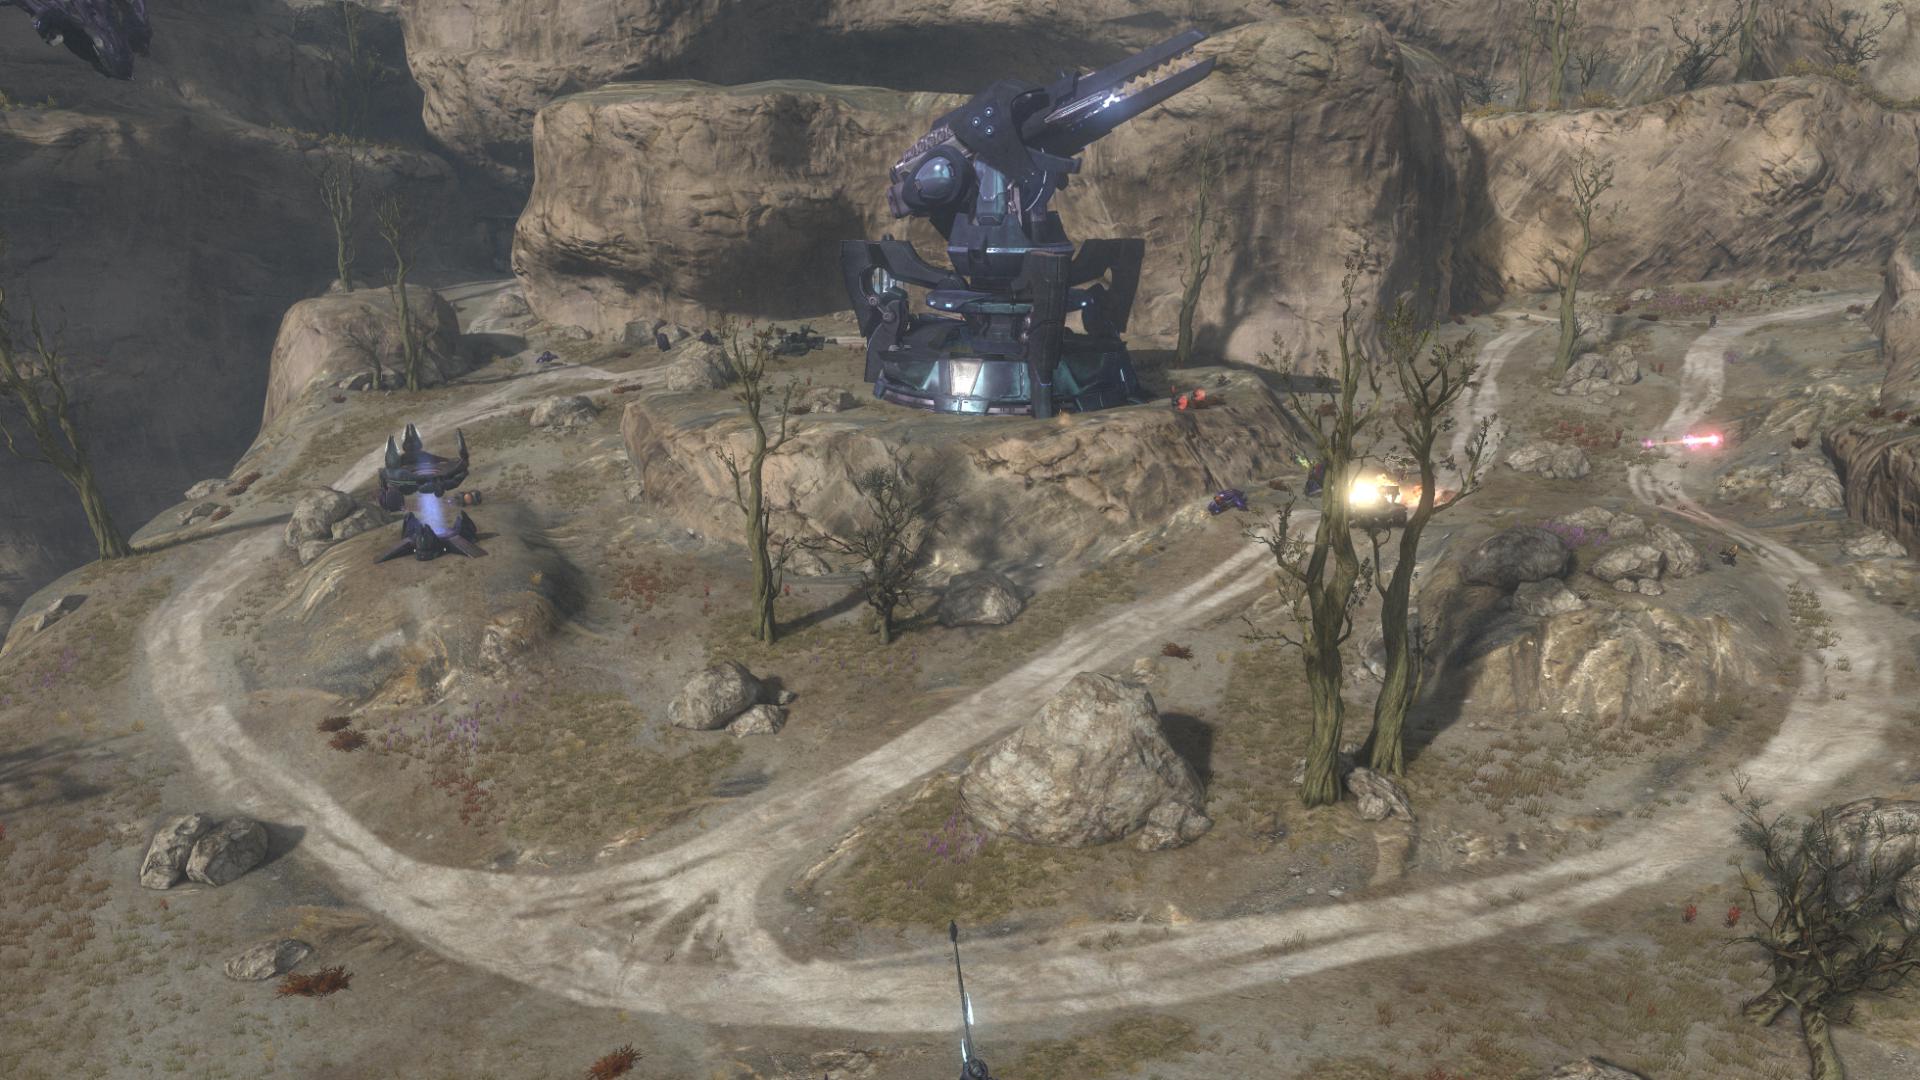
Thanks to the DMR, early campaign encounters settle into a pattern. We arrive at a location and see the Covenant in position from a distance. They can be whittled away at mid- to long-range, posing minimal threat to us. ONI again provides a good illustration of this problem.
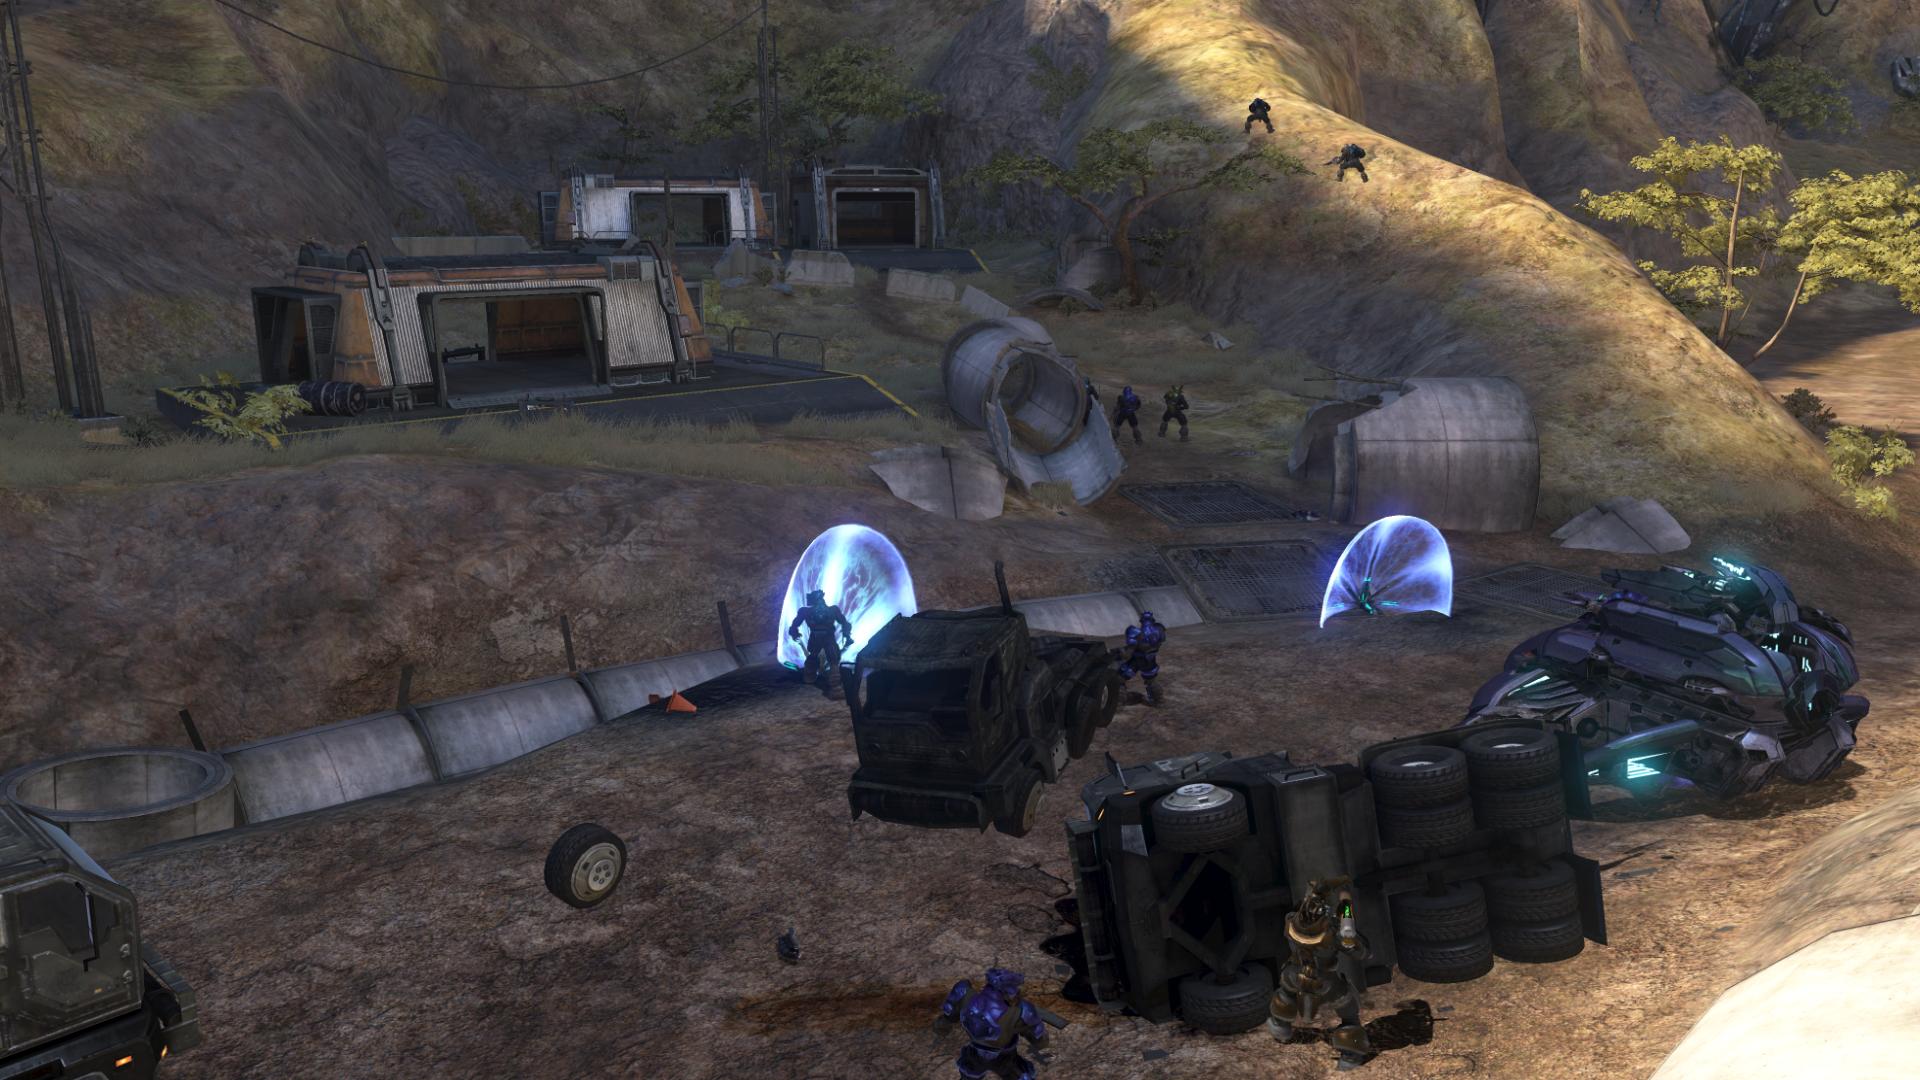
In this encounter around a downed anti-air gun in need of re-activation, the Covenant is arranged around a pair of buildings and between some large boulders. It’s an ideal setup for a free-flowing encounter, offering multiple approach paths, ample cover distributed throughout the battlefield, spare ammo caches located in highly defended locations presenting some risk/reward elements, a high ground to conquer and hold (the building) and enemy reinforcements that shake up the equation midway through.
But should we approach this encounter from the ONI base, we can handle the entire scenario in safety, thanks to the range and precision of the DMR. The enemy can seldom even shoot back.

Until the mission moves on to the interior of Sword Base, every encounter on ONI can be handled this way. It’s a pattern that emerges throughout the Campaign, where large, meticulously designed battles can be settled by sitting back and eliminating the opposition without ever having to use grenades, melee, most of the weapon sandbox or even cover.
Many of the best encounters in the Halo series were facilitated by the limited range of the weapon set available and the Chief’s relative agility. Among the standouts is an early battle in Halo 3, set in a cleverly designed hallway in Crow’s Nest. You know the one.
A sizable Brute pack, led by a hammer-toting Chieftain, is at one end of the two-level hall. We’ve been given the option of several weapons: the BR, the Shotgun and any others hauled along from the previous encounter. Because the pack was just outside of BR range, this battle can unfold in numerous ways. We could mix tactics, integrating shotgun ambushes of lone troops with grenades before falling back on longer range BR salvos as squads of Brutes were sent in as reinforcements. Movement was constant, between levels, through rooms and around cover because we couldn’t eliminate them before they reached us. The finale with the Chieftain was inevitably a hectic one, which presented an opportunity to deploy gravity lifts and anything else we could get our hands on.
Had we a DMR for this fight, we could have stood at our end of the hallway and headshot every Brute from there, and not a one would last long enough to close ranks with us. It would be a shooting gallery. And if they did close ranks, we could sprint to safety without fear of being caught from behind.
When the outdoors did not limit the range from which we could see an encounter set up, the design of the BR did. This battle in Halo 3, set amid the sun-drenched vista of Tsavo Highway, is memorable for the sheer number of enemies and the many ways the battle could unfold.
Similar to the AA gun fight on ONI, there is a spread of ample cover and an array of enemies mixed between them. Instead of an Elite General, there’s a Chieftain lurking in the distance. As on ONI, reinforcements deploy midway through and force an altered set of tactics we need to use (a Wraith pulls up along with a new round of Brutes, rather than a pair of Ghosts and Elite Rangers). But this time, in order to engage the Brutes we have to utilize the cover from the buildings and other structures in order to close the distance to BR range. Similar to the Crow’s Nest battle, that enables a mix of tactics and weapons to become more useful, and the battle can move all over the various structures.
As we arrive at the site of this encounter, there is a high perch over the entry way with a Sniper Rifle conveniently left behind. But the Sniper does not have enough ammo to kill many enemies, so we have to be selective. Meanwhile the effective range of the BR is not enough to engage all but the foremost handful of enemies. And even if it were, the 48-round firing capacity is not enough to take out everyone after the reinforcements land. There’s no choice but to dive in and get creative with the cover provided.
With a DMR, we could stand on the highway here, and thanks to the range, precision and 75-round capacity, kill everyone in the battle, including reinforcements, before moving on to the next encounter. Thanks to our reduced base traits and overbearing heavy ordnance from the Covenant, we’d have added motivation to do so. And then it would be reduced to the shooting gallery that the ONI encounter is reduced to.
This is a critical point because it is clear the Bungie mission designers intended combat in Reach to be as diverse and interesting as what came before it, and there is a great deal of strong encounter design throughout the missions. But the combat sandbox is not ideally suited to the mission designs. Had Reach’s rifles been in previous Halo titles, many of the greatest encounters would not be looked back on as being great.
What We Need, When We Need It
Compounding the problems introduced by the DMR is the way Reach undermines a key aspect of the two-weapon carry limit. The limitation only has an impact on our tactics if we have to make choices about what weapons to bring to the fight. The limitation was leveraged most in the first Halo game when power weapons were scarcely deployed. Choosing whether to bring the Sniper Rifle onto the Truth and Reconciliation was a consequential decision, as there were not spare rifles lying in wait once on board, only ammunition. That decision is the difference between taking a running-and-gunning approach versus sniping, and it was powerful enough to change how every encounter thereafter could play out. Those who brought it along were rewarded with frequent additional ammo drops. A similar situation takes place on Assault of the Control Room where a Rocket Launcher appeared early in the mission. If players lugged it through the level, they’re rewarded with additional rockets along the way — but not with a new launcher until the very end. Those who brought it along were rewarded with frequent additional ammo drops, while those who did not were deprived of the weapon until the very end.
As the series has gone on, the two-gun limit has had incrementally less impact on the mission design. In part because the Covenant gained equivalents of UNSC weapons in Halo 2, heavy ordnance appeared more frequently, first with the FRG and then the Brute Shot. A BR or Carbine was always available, and Covenant snipers would supply additional sniping weapons throughout missions.
In Reach, the consequences of the two-weapon limit have been washed away because the ideal weapons are handed out just before they are needed. This is the case on every mission in the game, but to illustrate it we’ll once again pick on ONI Sword Base.
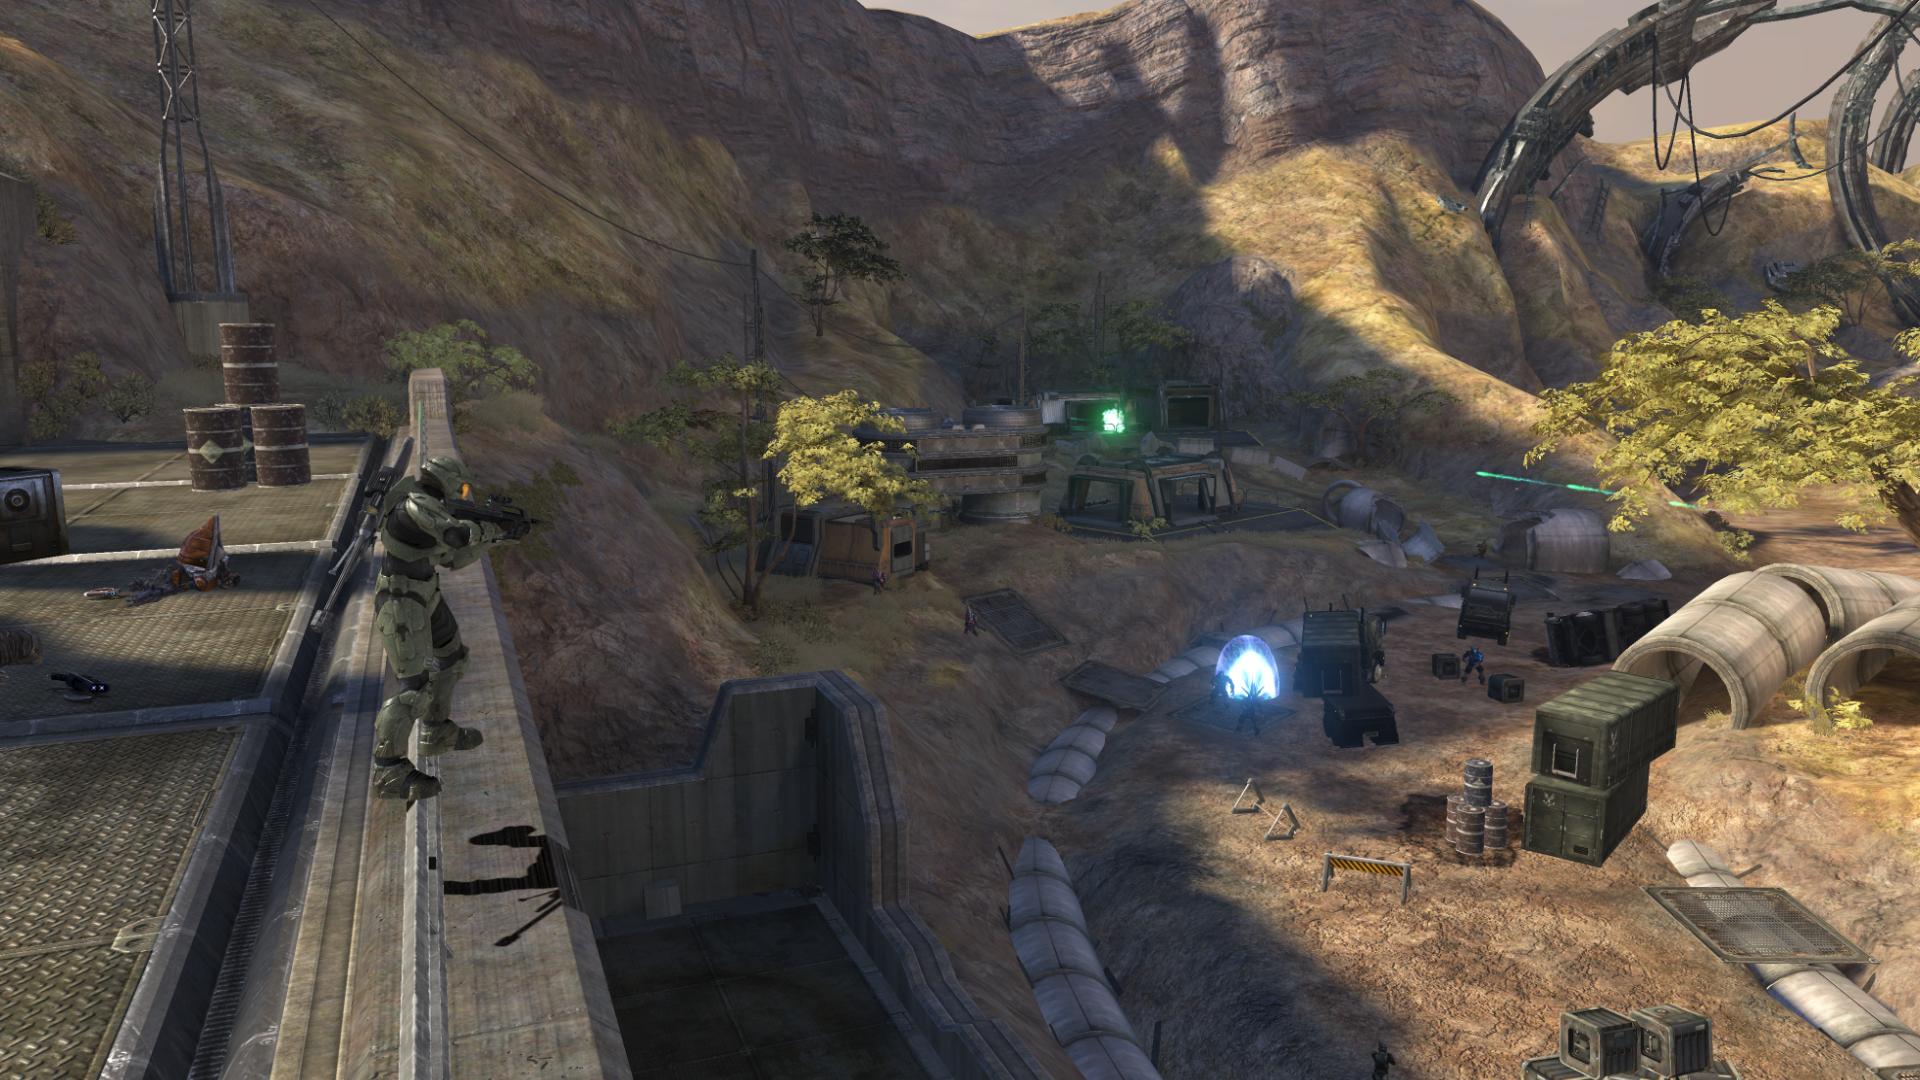
As the first encounter is whittled down, the invading Covenant squad, led by Elites, falls back and around the bend of the courtyard. As we pursue, there is a Sniper Rifle perched on the walkway that frames the combat floor in the ideal position to snipe the retreating enemy.
Immediately after is the lone cameo of the Target Locator, just in time to toast two Wraiths. After the Wraiths are destroyed, a Rocket Launcher with ample ammo is up next, for use at either of the next two objectives. At both the AA gun and generator encounters, heavy ordnance and additional Sniper Rifles are supplied for use on the subsequent battles, while DMR and Nerfle refills are plentiful. After both objectives are met, a Gauss Hog is dropped off just in time to tear through a pack of vehicles, and when the Hunters show up in the next encounter, the Shotty is conveniently there right before the entrance.
At no point do we have to make any hard decisions about what ordnance to choose for the next encounter. This is especially odd as the non-linear nature of the level could lead to some interesting options. If Reach followed the precedent set by the first Halo, that first Sniper Rifle in ONI’s courtyard would be the only one in the mission, but extra ammo would have been scattered here and there to reward those who lugged it around. Likewise, the rockets placed right after we kill the Wraiths would have been the only ones available, and we’d have to decide which objective to use them on — or whether to leave them behind for use on the Hunters. Choosing to take the sniper and the rockets to a battle would mean forgoing the DMR, a painful choice that would alter the shape of the encounters.
Reach’s approach to doling out weaponry is the definition of too much of a good thing, undercutting a core element of Halo’s combat design. Hopefully, Halo 4 better leverages the two-weapon carry limit.
Something Old, Something New
At this point in the series, we’ve come to expect certain things from Halo campaigns. We know there will be a mission where we spawn with a Sniper Rifle and a bucket of ammo, that we’ll barrel through a ‘wide tube’ mission in a Warthog, eventually hop into a Scorpion to blow the crap out of everything in our path for a while and that near the end of the game there will be a trench run of sorts in a vehicle. Reach dutifully checks these boxes, and in doing so often mixes together homages to iconic moments from the first game with fresh twists on them. Mingled within and between these familiar romps is a litany of new concepts for the series, mostly in the form of extended set pieces. Through it all, one of Reach’s greatest accomplishments is how even keel the campaign is, maintaining a high quality bar from start to finish, something the series has struggled to do in the past. Though some missions feature significant missteps, they are often just one small segment of the whole.
No mission better captures this mix than Long Night of Solace, a nostalgia sandwich with a unique set piece in the middle. A Cartographer-like beach battle gives way to space combat, which gives way to the invasion and commandeering of a Covenant Cruiser. The low gravity segment adds a unique gamplay twist, before settling into a brief but satisfying homage to the latter half of Truth and Reconciliation. The beach and cruiser sections are well executed, though their brevity the primary weakness. But as a whole, in presentation and scope, it’s among the most ambitious Halo missions to date. Narratively, it’s also the only time in the campaign when we really get a feel for what Noble Team is capable of, beyond dealing with AA guns and communications outages.
Other such nostalgia trips are found in two early missions, Winter Contingency and Nightfall. The former features a layout that closely mimics the structure of the second mission from Halo 1. Like that level, it begins with a wide but linear environment featuring a few medium-sized battles, and later opens into a hub with branches to different encounters on the level. The twist in Reach is that rather than spliting off into three areas from a central hub, much of the map folds together, crisscrossing paths linking sites where encounters are set. The encounters take advantage of this spiderweb structure, dynamically altering the trooper rescue location depending on the path we take, and leaving two skirmishes as optional.
Winter Contingency’s level is one of the most complex environments in the game; taking the time to trek through it on foot reveals a truly intricate, lushly detailed environment — most of which we usually blow past in a truck on the way to the few encounters. There is precious little combat given the size of the level. While the goal was to provide a feeling of exploration, a lot of development resources needs to be invested to create that feeling. Since the first Halo game, Bungie had avoided any nonlinear missions with open layouts, and that may be part of the reason why. The cost-to-payoff ratio of such a gorgeous, open environment is quite high.
The setting of Winter Contingency could perhaps have been better used later in the game, when the invasion was well underway and the space could have been more densly populated with encounters and so better utilized.
Nightfall is the second of Reach’s overt Halo 1 homages, a sniper mission complete with a nighttime setting, a narrow walkway atop a high cliff side, the drop-off to our left. Much like Truth and Reconciliation, after the initial encounters it shifts gears and begins mixing in opportunities for closer range combat. Unlike that mission, Nightfall keeps the mission progressing in one outdoor environment and breaks up the layout by folding in civilian buildings and structures. The flat top designs and open windows allow for ranged sniping, while also presenting enough cover to close the distances for some CQC and the use of the active camouflage armor ability.
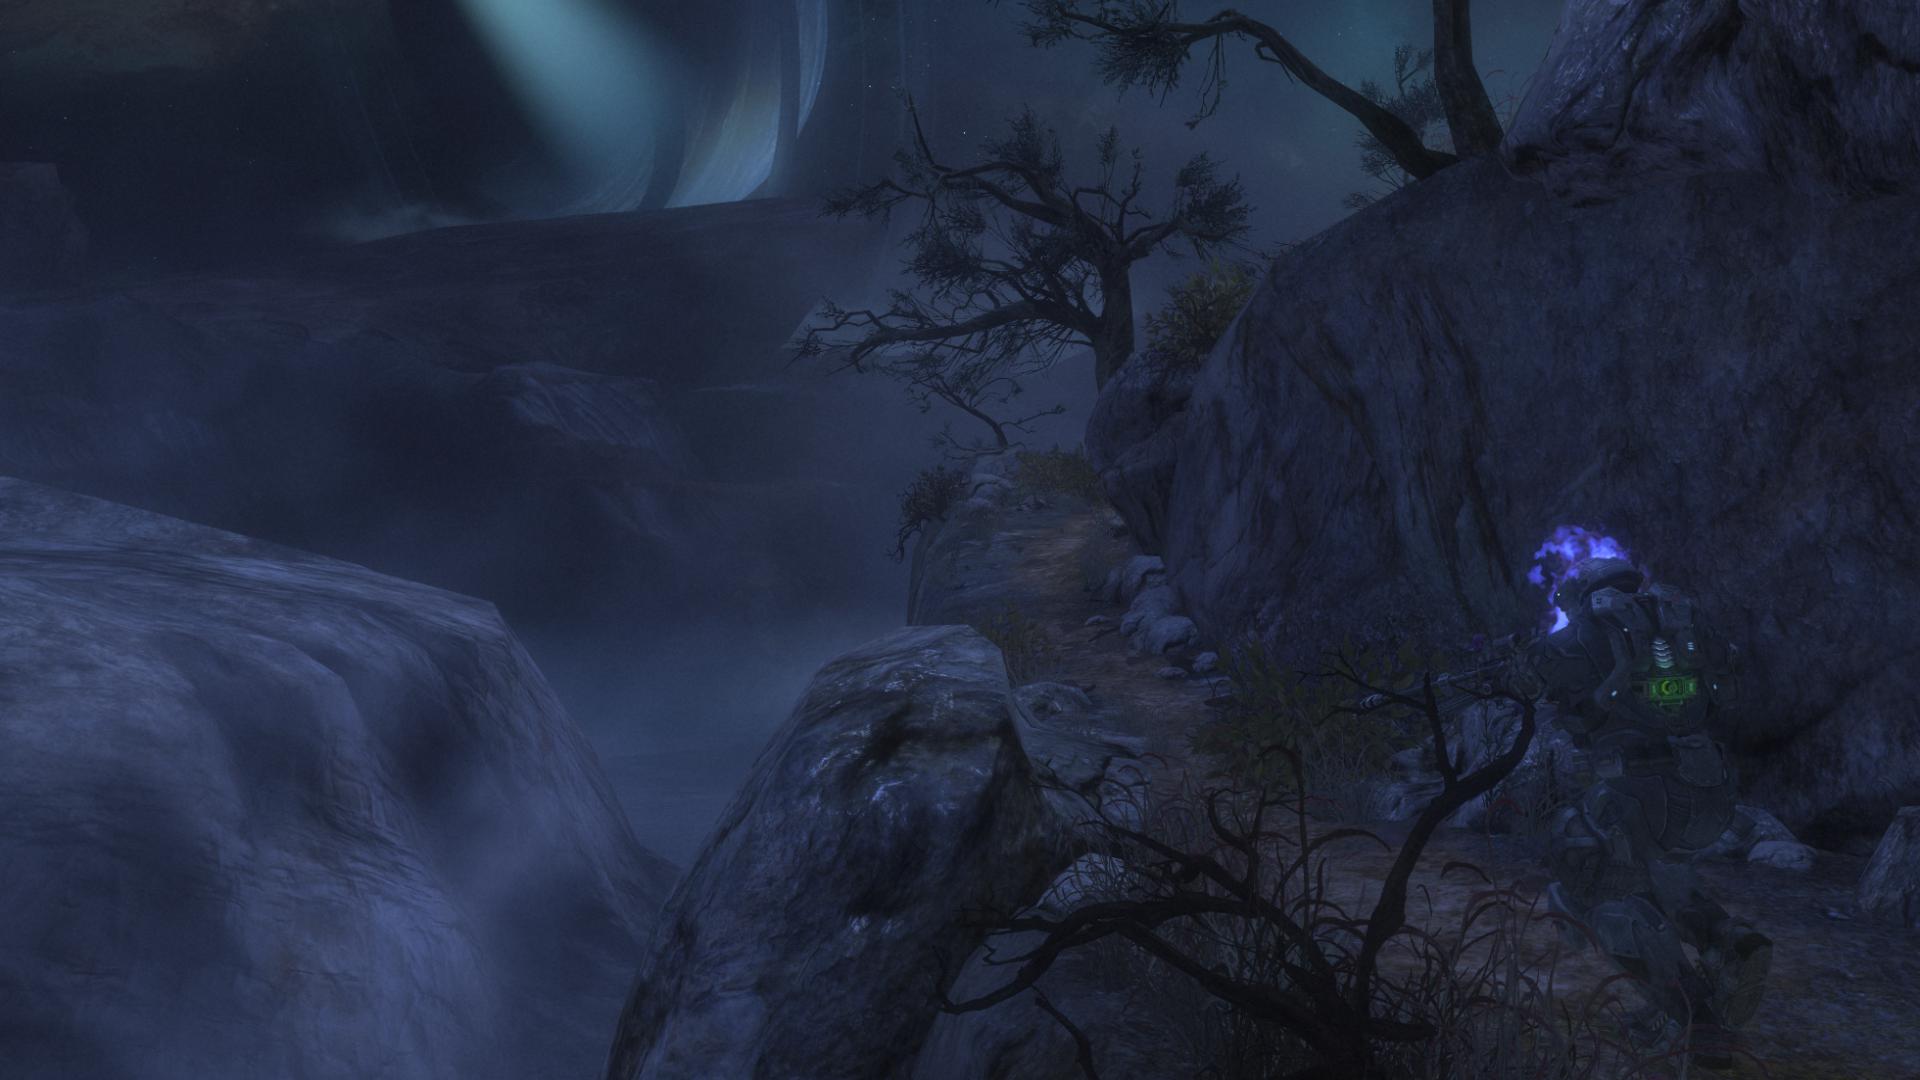
Nightfall’s pacing is well-crafted, with the mission moving through three major phases. First, there’s an initial series of areas ideal for long-range sniping with low enemy pressure in response. The middle of the mission features a pair of areas we first clear, and then defend, putting our backs to the wall. These encounters are set in areas that feature ample cover and short sight lines for close-range combat, but also have long or high approaches so that we can hang back and take a sniping approach if preferred. Finally, there is a final push against a heavily fortified region where the cost for error is steep, thanks to a higher concentration of high-ranking Elites and Reach’s beefed-up Shade turrets. Given Reach’s clumsier close quarters combat and the unpredictable ways enemy AI respond to the use of camo, the lower risk approach is to stick to sniping. Nonetheless, the options are there for the daring to sneak about ambushing enemies, and in the end Nightfall is one of Reach’s strongest missions.
Turtle, Turtle
At the risk of being overly broad, encounters in Halo (and indeed, most shooters) can be boiled down to two types: attack missions and defensive sieges. The first Halo game set a pattern the series has used extensively thereafter, beginning with the second mission. There are four battles structured around finding downed drop pods from the Pillar of Autumn, and most begin with an assault on an entrenched Covenant force before flipping the script and having us defend that same territory from incoming reinforcements. This pattern continues in Truth and Reconciliation, as we lay siege to squads departing the gravity lift, and then board and find the tables quickly turned. Siege encounters are now a familiar staple of Halo’s campaign missions.
Used well, they are a great way to vary the pace of the Campaign while also getting more gameplay out of the environments. Used poorly and they grind the narrative to a halt and become tedious, a test of patience as much as combat skills. This kind of battle needs to do three things well to avoid the latter camp. The premise of the siege must be plausible (say, clearing a landing zone), the battle must escalate naturally and without obviously triggered rounds and it must end before it has worn out its welcome.
The best siege battle in Reach comes early, as we first clear and then defend the entryway to a down communications outpost on Winter Contingency. While the premise is a bit convenient, the sheer number of invading Covenant pouring into such a small courtyard, coupled with their proximity to the wall our backs are pressed against, draws a strong parallel to the stacked odds Reach’s defenders face throughout the story. The battle is fierce, brief and ends with a bang, as the final waves overlap and push us back. In a great touch, we have the option to try and defeat the throng or to fall back.
Unfortunately, it is also one of the few in Reach that really works. While brief, the encounter just prior to the communications outpost sequence is more indicative of things to come. Upon finding the surviving troopers and clearing out the first wave of attackers, we settle in for a siege with arbitrary justification (our circling chopper cannot land near the hot zone, though we have no such qualms a few moments later at the communications outpost). At that point the first of two nearly identical squads of reinforcements arrives via drop ship, which clumps up on the road and never pressures our position. The clean, announced break between waves lends the battle a mechanical feel, and the disembarked Covenant lacks diversity, making the three rounds a grind, though a brief one.
The same cannot be said for two enormous, momentum-ending siege battles in the final two missions, The Package and the Pillar of Autumn. Intended to be climactic, both are instead grueling, with several distinct rounds to work through. By the time we clear out the second set of Brutes brought in as reinforcements on PoA, we’re ready to be done … and then another, larger set arrives. These two encounters feel like Firefight rounds (and not just for the settings, which were taken as Firefight maps) rather than organically building battles. The Package mixes things up by allowing us to use several different tactics to survive the siege, including heavy use of the automated turrets, abundant heavy ordnance and the option to hijack a Banshee, and so it’s the more successful of the two mega-sieges. But even then, it is still a protracted grind, and it takes place right when the game is struggling to build narrative momentum. And the premise — Halsey downloading data from some mysterious find — is murky and feels unjustified. That Halsey later refuses to specify just what she spent so much time working on deprives the siege from having a payoff.
The good news is that there are relatively few siege encounters in Reach, tapping out just short of a dozen. But the ones included in Reach are mostly pooly constructed, and the justifications for them are often contrived. In a narrative low point for the series, we get one defensive stand because a called apartment elevator is already being used a few floors down.
If that happened to us in real life, we’d go looking for the stairs.
The Best Defense
Reach is much more successful when it lets loose with a full-throated assault mission. Every Halo game features a mission or two where we cut loose and romp from one end to the other, usually in the middle section of the campaign to accelerate the pacing. Dubbed “wide tube” missions, they increase the scale of the battlefield to support vehicles and longer range outdoors combat. Assault on the Control Room, Delta Halo, The Ark and The Covenant are all missions cut from this mold. In Reach, those missions are ONI and Tip of the Spear, and they are both high points in the Campaign.
In many ways, ONI and Tip of the Spear share a similar overall design, begining with Kat and Noble Six entrenched behind a wall of attacking Covenant. The pressure is lighter and the flanking routes safer on ONI, fitting a mission so early in the game as players are still learning the combat mechanics. Spear begins us in much greater danger — a set of punishing FRG turrets firing on our location moments after the level starts.
After the introductory skirmishes of both missions, a Warthog is delivered, and we proceed down dirt roads toward a pair of objectives — switches to hit on ONI and AA guns to disable on Spear. ONI features shades of Winter Contingency’s nonlinearity, its two mid-mission objectives at either end of a wide loop, which can be traversed from either direction, while Spear’s romp is wider but more linear, with an on-foot segment in between to break up the pacing. The battles around these objectives are well-staged, offering multiple approach paths and are flexible enough to allow an infantry or vehicular assault. While well crafted, the second objective on each mission is curiously similar to the first.
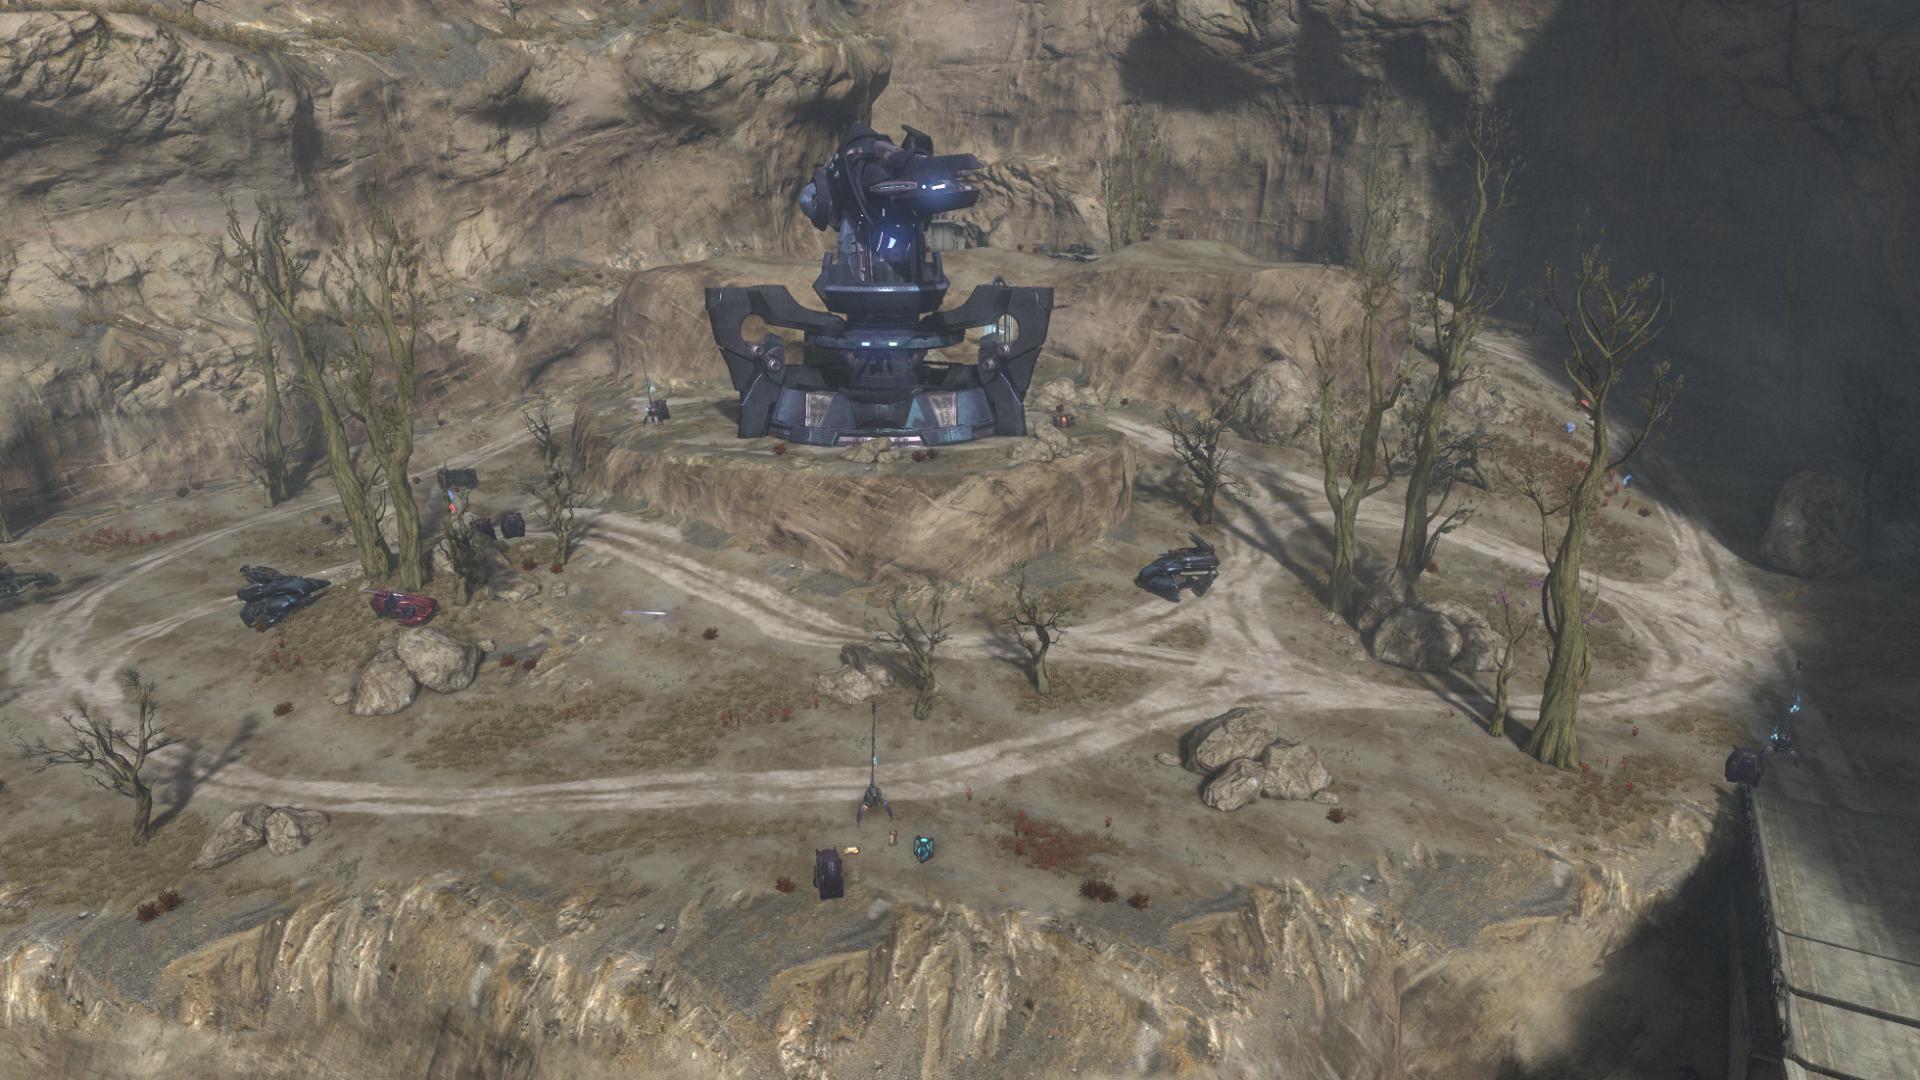
ONI’s AA gun and backup generator activation encounters are quite similar in scale, featuring about the same number of enemies that we engage from long to mid range in a circular, open expanse dotted with a pair of small buildings. Clear the Covenant out, hit a switch or two and then repeat. A reinforcing drop ship makes an appearance at the midpoint in the battle, and we get a fresh Warthog dropped to ferry us to the next goal at their conclusion. The layout of Spear’s two AA gun sites is likewise quite similar, with the gun set in the middle of a circular road encompassing it, allowing approaches from either side. Out in front, a vehicle or two patrols along with a tightly knit bunch of Covenant infantry. The set ups allow us to handle the encounters in multiple ways, from looping drive-bys to taking out the AA gun from afar, but they’re the same ways for both. It’s odd that ONI and Tip of the Spear’s twin mid-mission objectives each repeat so neatly.
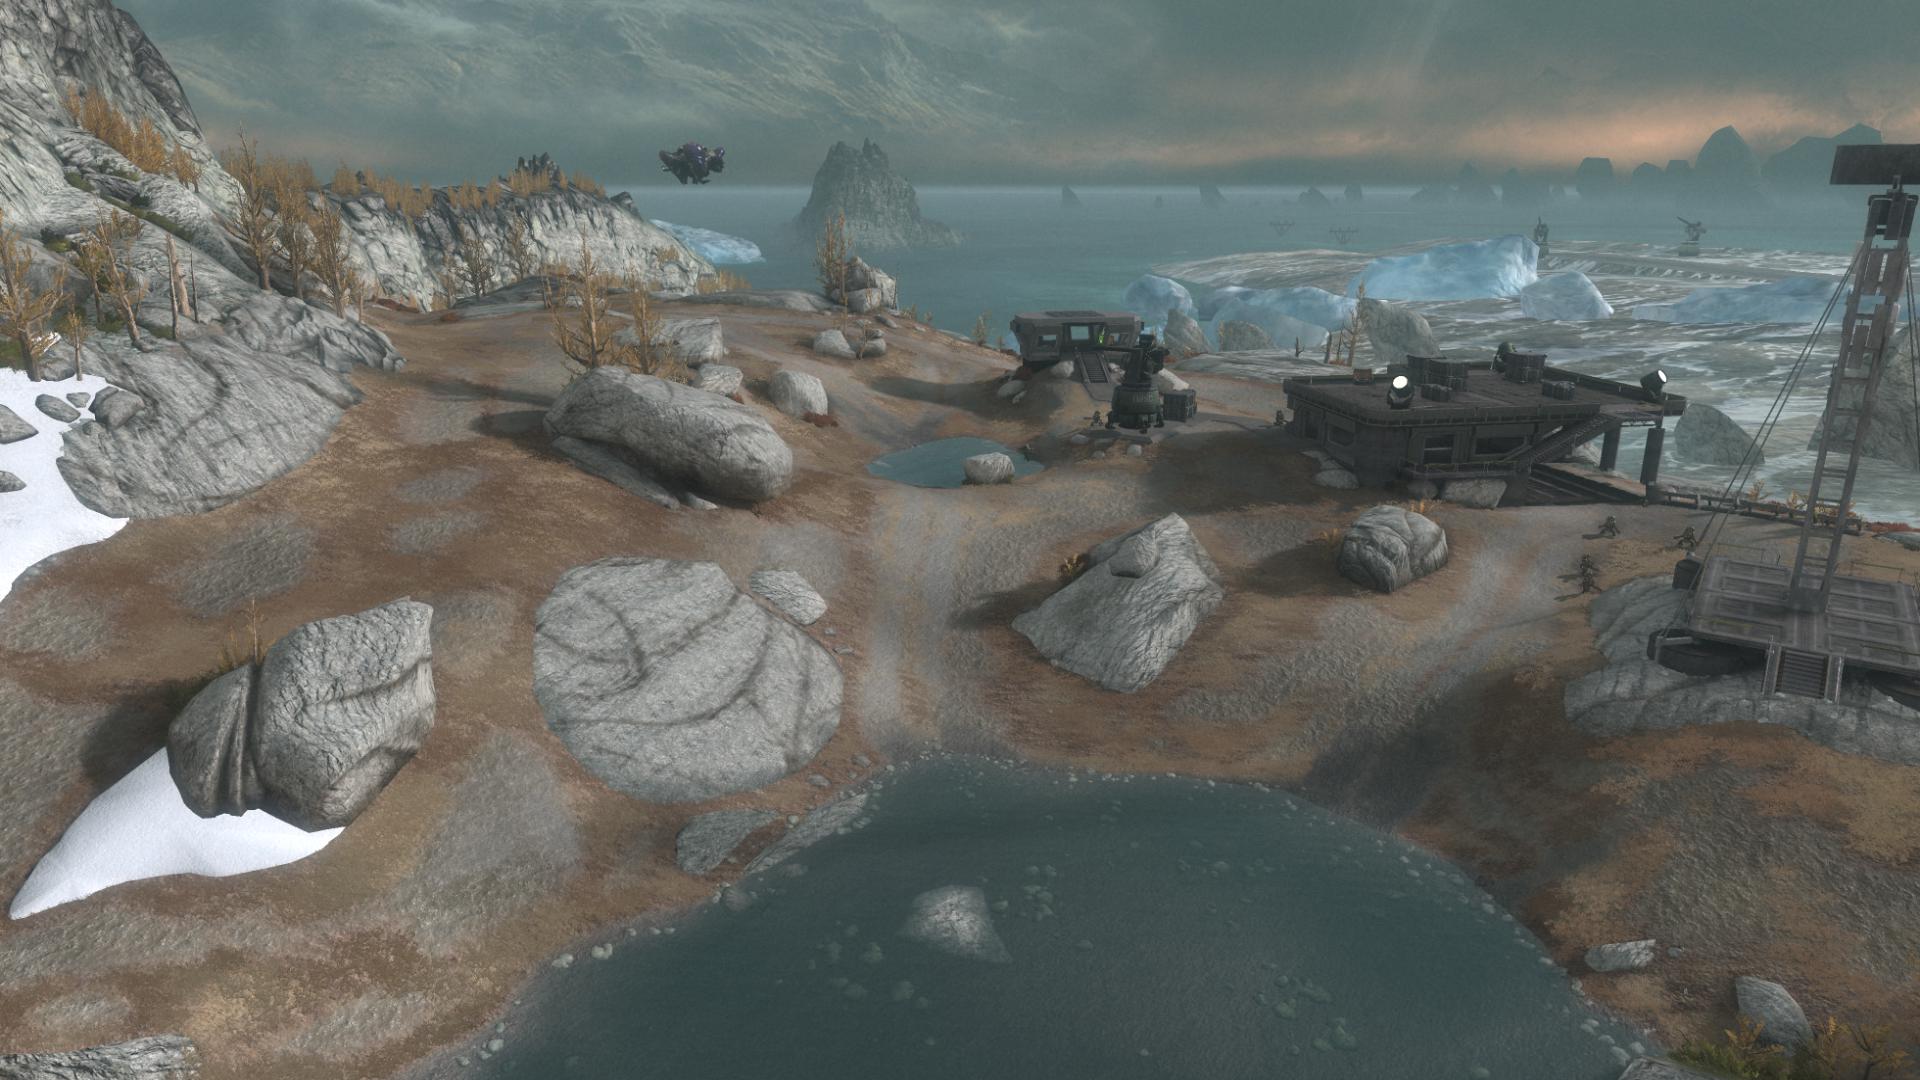
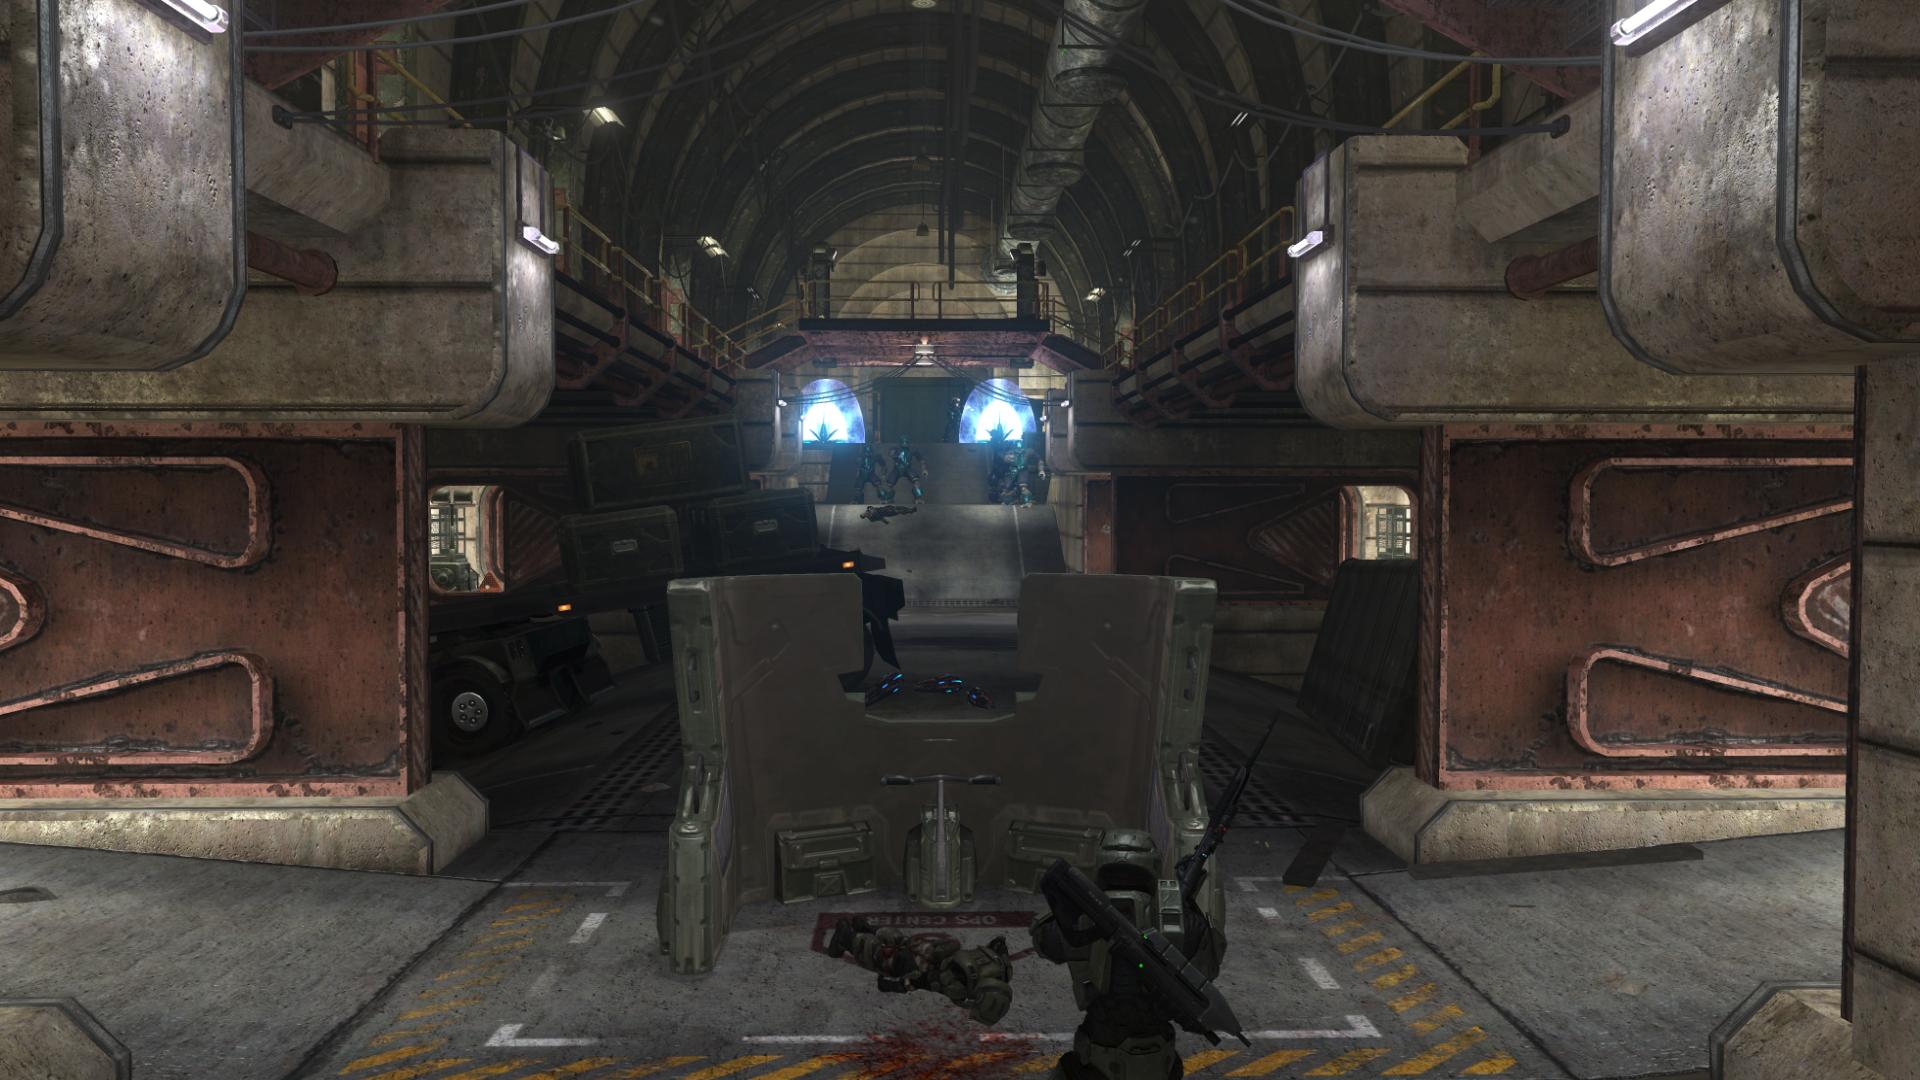
ONI and Spear both move toward satisfying, markedly different conclusions. ONI features a thundering trek through the besieged ONI interior before a Banshee turkey shoot, one of the most satisfying and tactical sequences in the game thanks to the multiple paths through the facility. (Something owed in part to the successful integration of a MP map design into the campaign.) Spear, meanwhile, opens up into a massive environment at the base of the spire, which can be taken out from above via a hijacked Banshee, sniped from the high approach or bypassed entirely. While ONI and Tip of the Spear stumble a bit from the internal repetition of their mid-mission objectives, they are well-paced, offer ample room for alternate combat tactics, build toward satisfying conclusions and are the strongest missions in the game.
Nice job elaborating on Reach’s strengths and weaknesses – we shared many of the same opinions here, but you did a much better job examining them than my brain did. 🙂
Woah….. there’s a lot of thought in there – I’d never really thought about how the change to DMR really changed up the play from H3/ODST to Reach – I think it’s a sign of a great game where most players would not have noticed this variable change – at least in their first run through.
Cheers
I shared much of these thoughts myself, but as Leviathan has already said, you pulled much more out of it than I managed to.
I really wanted to love Reach, but these rough edges that you touched upon, combined with the loss of signature Halo music (which was much more of Halo than I thought, because I missed it constantly) really hampered it for me.
I still think of Halo 3 when I think of the Halo series in general.
It’s like you took the most wonderfully high level of vocabulary I don’t have and used it to write out exactly how I felt when playing every bit of Reach. Bravo, sir. This surely was a pleasure to read through.
Being able to put words to how Reach makes me feel is a powerful thing.
I liked the Magnum’s roll in campaign. During LASO challenge runs, I’d use it up whenever it was available over using the DMR. Gotta save that precious DMR ammo for the long range encounters. As you know, prepping for LASO or any other high difficulty is an important part of the game plan. If the Magnum is in limited supply during the easier difficulty settings, is that really a problem? Perhaps it’s all part of a required redundancy to accommodate the variety of difficulty settings.
I think I prefer the Halo 3 Hornet over the REACH Falcon. I believe it filled campaign and multiplayer roles better. I know your document is about campaign but the inability for the Falcon to carry objective holding passengers in multiplayer has me ticked off at it.
Regarding the Chopper. You said “a shadow of the Chopper where the gulf between a skilled and unskilled pilot was vast”. I feel you let multiplayer capabilities creep into the discussion here. I doubt driver skill level plays a serious role for either of these two vehicles in campaign. They both have a fairly good stand off capability in campaign though I’m quite sure the Chopper had greater range with easier aiming than the Revenant has. That would make it easier for unskilled pilots to use in campaign. As for multiplayer, I think the story is reversed.
Regarding vehicle health decoupling. I am okay with vehicle strength being completely independent from personal health. I also believe occupants with any shields and full health should survive the exploding vehicle. While playing campaign, this situation was never a problem for me. It is a bigger problem in multiplayer.
I am very impressed with your inclusion of video examples.
Absolutely spot on. Many issues in this article are ones which I picked up myself but couldn’t seem to fathom [i]how[/i] it was an issue, something which you have enlightened to me now. I have to agree with HSAR’s opinion of Halo 3 being the monument of Haloness. I think we will see these issues much more clearly when Halo:CEA is released. Thanks for writing such a brilliantly thought out article.
Wow, italics fail on my behalf ^. Still kinda new to that kinda stuff =D
Regarding the Crow’s Nest, hallway and Brute encounter. I always used the same approach with the BR as I now do with the DMR. Whittle away the shields or armour with lesser weapons and then headshot them with the BR. There was a perfect yet narrow range for this combat to occur. So I guess I disagree with your opinion on the BR vs DMR in some situations even though I agree the DMR has a greater effective range.
One thing that must be considered is, the statistical information the developer has acquired from previous titles. I.E. They know how many people have completed the campaign and on what difficulties. Some of the design decisions you are unhappy with may have been the result of an effort to attract more players into playing further into the game and at greater difficulty settings. If successful, the game could become more satisfying to a larger player base. The side effect of such efforts is the loss of the game’s long standing veterans. Perhaps such losses are inconsequential when it comes to selling games and dare I say, ‘beneficial’.
Sorry for the multiple posts. I am not sure when I’ll stop reading the article and when I might get back to it. So I am reading a bit and posting a bit.
The space flight sections were what I enjoyed the least. Like so many flight/space battles, you wind up chasing pixels. Specks of information on the screen which you target and destroy. The enemy is rarely close and the narrow POV makes for either extremely difficult or very easy combat. Once I learned to hide behind the main station structure or behind the Savannah later on, the battles became boring while praying not to get killed on the higher difficulty settings. I simply endured the situation.
I was skimming at the end because it was so extensive and my attention span had expired. Perhaps you should have released this in segments starting months ago.
Great write up GhaleonEB. I’ll bet a couple of developers, who are near and dear to us, are going read this very carefully.
Much of what’ve you said, I agree with. It’s a superb analysis. There is one bit though, which disappointed me more than any other facet of Reach’s design, and that’s the story.
In the FoR novel, there are incredible opportunities to create the greatest Halo campaign of all time. Almost all were ignored. We get no true sense of grandeur, or epicness, save for the truly brilliant New Alexandria mission. Noble’s Spartans are very poorly utilised, as you pointed out. The game failed for me, spectacularly, and was almost insultingly easy to complete on Legendary. Only the Halo 2 campaign failed worse than this, in my opinion. If I want to remember Halo ten years from now, I’ll play Halos 1, 3 and ODST…and Reach will lie forgotten.
I hope 343i take head of your comments about friendly AI and your comments about their driving.
If 343i can’t fix friendly driving then don’t have them drive unless they have been told to drive via script. Or… there are plenty of spare buttons and axes available when you are a hog gunner for giving the driver instructions (stop/go, directions) and for fast position switches that wouldn’t even require dismounting.
We should have Warthogs in Halo 4 but will we have friendlies?
-PS
You can ditch Jorge in the spire encounter – equip jetpack and drive one of the trucks. Jorge will take his gunner position and then you can drive the truck over the cliff. Jorge will have no hard feelings about it and will give you encouraging comments from time to time from his position at the base of the cliff.
You will find it easier to board a Banshee without Jorge shooting both craft out of the skies.
I disagree on multiple points. The biggest one has to be saying that Combat Evolved had a rafined combat. Once the Magnum was introduced, all of the levels became a walk in the park. The only moderately difficult level was Truth and Reconciliation, and that was because it had no Magnum. That Pistol, like the DMR, lead fight on long ranges where enemies did not stand a chance, and it was, honestly, the best weapon for all enemies and ammo for it was abundant.
Another thing I disagree is on weapon “babysitting”. Combat Evolved did have that…in massive amounts. Take Assault on the Control Room, once you get outside you have a Sniper and Rocket. Ok? You are basically set for the rest of the level. There is ammo in the first area you find them, then there’s ammo in the next area near the Scorpion (another tool that makes the level a cake walk), then you have ammo inside the cave, once outside you have, yet again ammo near the pillar structure in the next canyon. Once you go through there, you have ammo again after you defeat the hunters. Another thing is that massive battles are seldom avoided by the use of active camo, which is found in lots of convenient places. The camo in AotCR is found in the big pillar, and it gives you enough time to make it to another one where the Marines are pinned down by the Hunters, and that ones allows you to run from a massive army. The saddest thing is that, without that camo, you could have actually helped the marines which were pinned down from the Shades, but no. Another one is found in the invis elite room, and allows you to walk outside in the Control Room canyon and jack a Banshee and end the level…? All you need is to replay the level and you are set. Like you said in some cases in Reach, you can diversify the combat, but you are risking by not accepting the easier way out. That is true in the encounter I mentioned earlier. Why fight your way to the pyramid when you can just jack the Banshee and skip?
Another thing that i disagree is the Marine/Noble team friendly AI. Noble team needs to be the meat shields, the NPCs that kill few enemies, since they are pretty much invincible, they are automatically overpowered. If you have enough patience, you ca let them do everything, yet it takes a long time. That’s the general concept of not making hard difficulties easier by aid of invincible allies. As for Marines, they will generally do a good job at shooting, I mean you can play easy normal, and see that they do a pretty good job, the only thing they really don not do well is driving, i agree on this. Their driving is horrible. But aside from that, as in previous Halos, arming them with better weapons will give you a great advantage. In ONI, i got Kat on the Gauss turret, and a rocket marine in the side seat. They tore through everything, yet you still had to drive them well. The Hog is a teamwork vehicles, be it in MM or Campaign, bot the driver and gunner need to do something. If you just drive the Hog close, stop and expect the AI to kill everything, the enemy will take advantage of that. You need to navigate the vehicle so that the gunner has a chance to shoot, while the enemy has a hard time to react.
Yet another thing is the vehicles, they do “seems” to have a random explosion pattern, but it is not the case once you start to learn them. Revys and Wraiths can take a beating and will not explode even when smoking. Ghosts and Warthogs will once the vehicle’s body begins to degrade and when fire/smoke rises from it. In that case, the solutions are to either abandon it or to driver through and maneuver is such a way as to not get shot. Elementary. And the Revenant has a pretty big role. It’s the medium assault vehicles between the overpowered wraith and underpowered Ghost. It fills in the gap of defending medium sized area with moderate firepower, and somewhat resembles the Prowler by the added passenger.
Spectacular write up, but I’m going to disagree with your analysis of Lone Wolf. It just seemed tacked on to me, like Bungie said ‘whoops, we forgot to kill off Noble 6, let’s just throw him up against some enemies in an unwinnable situation’. I would have preferred that Noble 6 die at the end of PoA, perhaps sacrificing himself somehow so the PoA could safely escape. This could have even mirrored Jorge’s death, ie, someone has to stay behind to arm the bomb. Otherwise I just felt that Lone Wolf was a rather lazy way to have Noble 6 die off, and not even in an honorable or inspiring way.